
Monthly Archives: June 2013
Reflections on a flipped lesson
I am no authority on ‘flipped lesson’, but I wanted to share my first real experience trying out a completely ‘flipped lesson’with a year 10 class. In case you didn’t know, the premise is that in a traditional (maths) classroom, the teacher delivers a lecture to the class, and then for homework they attempt practice questions. In the ‘flipped lesson’, they watch the video lecture for homework, and then attempt practice questions in class, thus giving them more time to ask their questions teachers for help and support.
So, I started by creating a short video lecture on electrical power, the use of fuses, and energy transferred. In their previous lesson, I set the class a homework to watch the video and make notes, pausing it when they needed, and rewinding if necessary. Here is the video lecture they watched:
Click here for a post showing how I made this video lesson.
The lesson consisted of three activities; pupils had to choose which to tackle, and in which order they should approach them. I also told them that I expected everyone to have completed at least two tasks, but that some of them should complete all three. In order to participate, they first had to show evidence that they had made the notes from the video. (One pupil hadn’t done the homework, and so he went off to the computer room to watch the video and make notes first).
I had written on the board:
1. Practical task. This is designed to help your conceptual understanding.
2. Calculation practice. This is designed to help you apply the mathematical formulae.
3. Problem solving task. This will allow you to work creatively. It is probably best for an extension task.
The idea was to give the class responsibility for their own learning; they choose what task to do after having thought about the reason they were going to do it. Most pupils enjoy practical work in science, and the majority did indeed start with the practical task, but a couple opted to do the calculations first. What was interesting was that they were all able to explain to me why they had chosen their particular activity first; they had definitely engaged with the pedagogical reasoning behind the lesson.
The group worked with a real sense of purpose and engagement. What was particularly noticeable was the relatively seamless way they moved from one activity to the next; they didn’t require a motivational speech once in the one hour lesson, as groups often do when you change the activity at the same time for all pupils.
At the end of the lesson, I asked them to complete a short survey, and to offer any other thoughts. I’ve summarised the class responses graphically below:

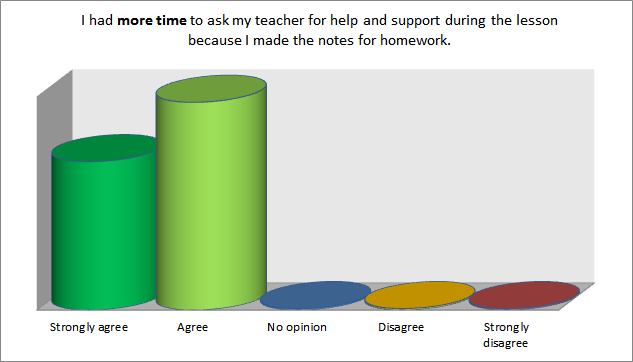


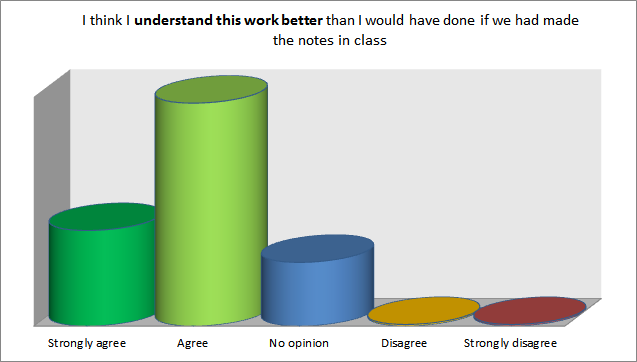
Figure 1: Post flipped-lesson questionnaire results
The results of this short questionnaire are extremely positive, and show that my pupils appreciated the style and way of working. There are a number in the class who are dyslexic, and find it difficult copying from the board; it was encouraging that one of those pupils commented:
“It is helpful because we have to think about the notes for ourselves from the video rather than just copying down words and diagrams from the board.”
This seemed strange to me at first, because I didn’t think that there was a huge difference between the way I would do this in a lesson. Yet somehow the task seems to have been more engaging for this pupil. Another dyslexic pupil commented:
“I find it easier to write the notes because you are reading what I need to write down.”
I also read aloud what I am writing in class, but because in the flipped lesson he could pause the video, the result is that I was reading at the pace at which he was writing, so the note taking instantly became easier for him. The only negative comment was that:
“I enjoyed it, but sometimes when you can’t ask questions it can be annoying.”
However, it was interesting that this particular pupil agreed that he had more time to ask his teacher for help and support during the lesson. Next time I set a flipped lesson, I will also ask them to write down a list of questions as they come across them. Sometimes you can forget what you were going to ask when you have the opportunity to do so later. Another pupil commented:
“It is efficient because you can revise in your own time and it has more information.”
I’m particularly keen on this point; flipped lessons as a revision aid allow pupils to work at their own pace, and in their own time. My YouTube channel contains a large number of revision videos designed to help pupils to revise by watching a flipped lesson. It is a shame that, for the vast majority, as my channel’s viewing stats show, they revise the day before the exam itself!

Figure 2: Most people revise the day before the exam.
Retrospectively, I should have asked questions that were less leading; for example the first question could have been phrased “Do you think that making notes for homework instead of doing practice questions is a [much better], [better], [no different], [worse], [much worse] way of working”. In my defence I can say that for simplicity’s sake, I wanted the answers to be the same for each question; but perhaps I have led them to believe that the outcome I was looking for was true. Or perhaps it shows that my pupils have been persuaded by me that the flipped lesson has educational merit. Either way, their behaviour and motivation during the lesson itself has certainly shown me that there is a lot to be gained from this approach. It certainly takes time to set up in advance, but I think that time is a worthwhile investment.
Filed under Reflections
Creating a flipped video lesson using PowerPoint 2010
I made this flipped video lesson using PowerPoint 2010. Once the slides are made, I added animations to make the text reveal a bit at a time; particularly with examples of calculations I wanted each line of the calculation to reveal a bit at a time, so I could encourage my students to follow the right methodology. To do this, click the animations tab, select the text to be animated, then choose the animation type from the selection. Finally, click effect options, and choose the Sequence > By Paragraph option to make the text reveal a line at a time when you click.

To add the narration and laser pointer, click record slide show from the slideshow tab. You’ll need a microphone connected (I used a Zoom H1 mic; the accessories kit comes with a small desktop tripod). To get the laser pointer effect, hold down CTRL and click with the mouse. I found that I wanted to correct my voiceover occasionally; PowerPoint lets you rerecord the narration for a single slide at a time, but not for a part of a slide. I found it helped to practise the narration once for each slide before recording it. When you’re happy with your slideshow, click File > Save and Send > Create a video. You’ll then need somewhere to host it like YouTube or Vimeo; both offer free accounts.

